

What Are the Most Reported Navisworks Queries Among Professionals?
Professionals using Navisworks software often encounter similar questions while managing their BIM workflows. Below are the most frequently asked queries and how to address them clearly and effectively.
1. How to Add Navisworks in Revit
Install the NWC Exporter plugin for Revit to integrate Navisworks software. Under the Add-ins tab, use External Tools → “Navisworks 2026” to export. Always clean and save your Revit model before exporting for better results.
2. How to Align Models in Navisworks
To resolve misalignment, open the Selection Tree, select the model, and use the Transformation tab to adjust position or rotation manually. Standardizing shared coordinates before importing files into Navisworks software helps maintain alignment across disciplines.
3. How to Change Color in Navisworks
Open the Appearance Profiler from the Viewpoint tab to change element colors by category, property, or layer. Overrides offer clearer visual distinction and are helpful during coordination reviews or presentations.
4. How to Change Coordinates in Navisworks
Use the Transform tool in the Item Tools panel. You can input new X, Y, and Z coordinates or move the object using the drag function. Note that this adjustment is only visual and does not modify the original model.
5. How to Change Navisworks Background Color
Go to Options → Interface → Colors. Here, choose between a solid or gradient background. Many users opt for neutral shades to reduce visual fatigue when using Autodesk Navisworks software for long sessions.
6. How to Change Units in Navisworks
Navigate to Options → File Readers, then select your file type (DWG, RVT, etc.). From here, define your preferred length units. Restarting Navisworks software will apply the updated settings across models.
7. How to Check Coordinates in Navisworks
Click an object and open the Properties panel. Under the Geometry or Transform section, you’ll find exact X, Y, and Z coordinate values, which are essential for verifying model placement.
8. How to Check Elevation in Navisworks
Use the Measure Tool and hover between two points. The Y-axis value reveals elevation data. You can also find elevation in the Properties panel for selected objects.
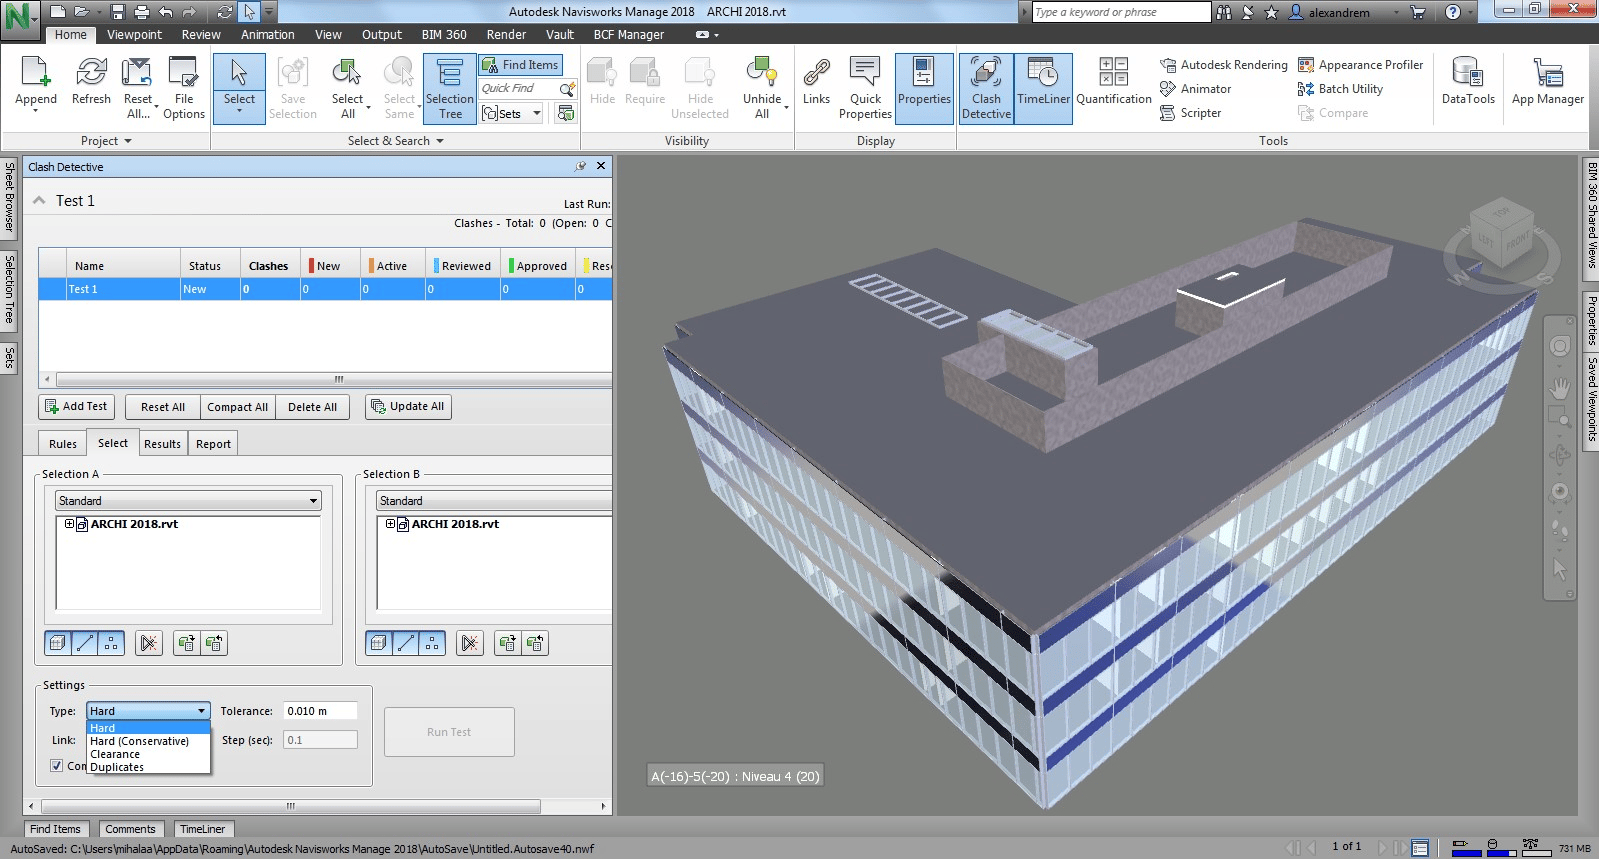
9. How to Perform Clash Detection in Navisworks
Start by launching the Clash Detective tool. Define your test parameters by selecting models or layers, then run the test. Results can be reviewed, grouped, and documented using viewpoints for reporting and discussion.
10. How to Use Navisworks with Revit
To work effectively with Navisworks software and Revit, export from Revit using the NWC Exporter. Ensure both tools use a shared coordinate system. This integration improves clash detection and model accuracy across platforms, supporting multiple dimensions in BIM, such as 3D coordination and 4D scheduling
11. How to Convert Navisworks to AutoCAD
Although a direct export isn’t supported, export the model as an FBX file. Then, open it in 3ds Max and save it as a DWG. This process retains geometry but may exclude metadata.
12. How to Convert Navisworks to Revit
Navisworks software files can’t be converted back into editable Revit files. However, you can export to NWC format and link the model in Revit. This supports reference workflows without overwriting original content.
13. How to Convert Revit File to Navisworks
Use the NWC Exporter within Revit’s Add-ins tab. Confirm that the exporter version matches your Navisworks software version to ensure the file imports correctly.
14. How to Create Search Sets in Navisworks
Search sets filter and group model elements. Use Find Items to define your filters by property, and then save them. These sets are valuable for navigation, clash detection, and presentations.
15. How to Export Clash Report in Navisworks
After completing a clash test, navigate to the Report tab. Export reports in HTML or XML formats, including issue details, screenshots, and annotations to facilitate team communication.
16. How to Export IFC from Navisworks
Select File → Export → 3D Model and choose IFC as the output format. Adjust object mapping settings to ensure model data and geometry are preserved accurately in the exported file.
17. How to Find Element ID in Navisworks
Select the desired item and open the Properties tab. If the model is Revit-based, the element ID will be visible under the Revit properties section. This ID helps in cross-referencing changes.
18. How to Get Coordinates in Navisworks
Click on any point using the Measure Tool. The corresponding X, Y, and Z coordinates will appear in the toolbar or the Selection Inspector. This helps validate spatial alignment.
19. How to Move Object in Navisworks
Open the Transform tool and drag the object to reposition it, or enter coordinate values manually. These movements are temporary and do not affect the original file or model structure.
20. How to Open IFC File in Navisworks Manage
To open an IFC file, go to File → Open and select the file. Ensure the IFC loader is activated under Options → File Readers if the model does not appear correctly.
21. How to Render in Navisworks
Go to the Render tab and select Autodesk Rendering. Modify materials, environment, and lighting settings as needed. Rendering can be performed locally or through the Autodesk cloud platform.
22. How to Rotate in Navisworks
Use the Transform tool’s rotation feature. Drag the rotation handles or manually enter angle values. This is useful during visualization and coordination workflows.
23. How to Save Viewpoint in Navisworks Freedom
Position your view, then navigate to the Viewpoint tab and click “Save Viewpoint.” You can organize viewpoints into folders and add comments or tags to support coordination meetings.
How to Prevent These Common Navisworks Problems in the Future?
Most challenges with Autodesk Navisworks software stem from inconsistent workflows or overlooked settings. With the right structure and habits, users can enhance coordination and reduce errors.
Here are practical measures to consider:
-
Standardize coordinate systems in Revit and other authoring tools before exporting to Navisworks software
-
Update all plugins and exporters to match your current Navisworks software version
-
Establish naming conventions for models, clash sets, and viewpoints
-
Use search sets to automate selection criteria and group objects efficiently
-
Enable cloud storage or syncing, allowing real-time collaboration and fewer version conflicts
-
Train project teams on basic transformations, measurement tools, and viewpoint management
-
Create reusable templates for clash tests and export settings
By maintaining these habits across teams and projects, professionals can reduce frustration, gain consistency, and make the most of their Navisworks software investment.