.jpg)


What is D5 Render and How it Integrates with SketchUp?
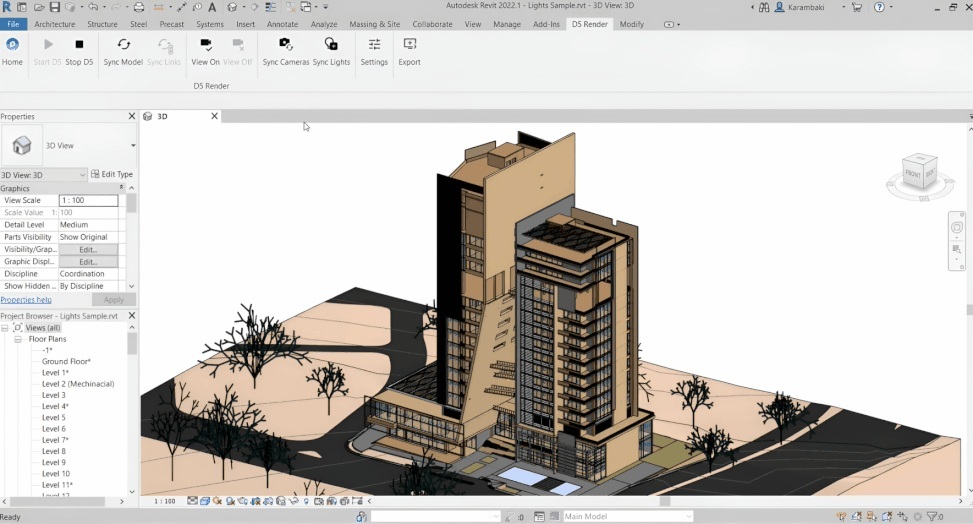
D5 Render is a GPU-powered real-time rendering engine developed to simplify the rendering process for designers. Its direct plugin connects SketchUp and D5 in real time, allowing geometry, materials, and camera positions to remain consistent across both platforms. This live connection eliminates the need for repeated exporting or re-linking, making the design-to-render process faster and smoother.
The integration supports model import, material mapping, lighting synchronisation, and live previews, enabling architects to make design decisions while viewing realistic outcomes instantly. This functionality makes D5 an excellent fit for presentation workflows, concept development, and iterative design reviews.
Why Use D5 Render with SketchUp?
Using D5 with SketchUp significantly enhances design productivity and presentation quality.
- Faster Iterations: The live sync between SketchUp and D5 render reduces manual export time and allows you to see instant updates when you modify models or materials.
- Real-Time Lighting and Atmosphere: Adjusting light intensity, shadows, and time of day in D5 immediately changes the mood of your scene, helping achieve realistic results faster.
- Easy Material Editing: The interface allows quick refinements through sliders and presets, letting you modify reflectivity, roughness, or texture scale in real time.
- Useful for Client Presentations: You can present live walkthroughs, quickly alter designs during meetings, and deliver higher-quality visuals with minimal effort.
Understanding D5 Render Workflow For SketchUp
An organised approach helps achieve the best results. Here’s a step-by-step SketchUp to d5 render workflow you can follow.
-
Prepare the SketchUp model: Clean out unnecessary geometry, group objects, and assign sensible layers/tags. Remove unseen faces and keep scale accurate.
-
Set up scene cameras in SketchUp: Position views you want to export and name scenes for easy recall.
-
Install and enable the D5 plugin: Open D5 and use the plugin to link the SketchUp file via live sync.
-
Import materials carefully: Use SketchUp material names so they map easily in D5, replace or refine with D5 render textures where needed.
-
Adjust lighting and sky in D5: Set sun position, HDR environment, and intensity to match your design intent.
-
Fine-tune materials and reflections: Use D5’s sliders for roughness, metallic values, and bump maps.
-
Add vegetation, people, and assets: Use the D5 Asset Library to enrich your scene with realistic objects that match scale and lighting.
-
Test small, render progressively: Start with low settings for composition, then increase quality for final output.
-
Export passes and post-process if needed: Use AOVs or separate passes for more control in post.
If you prefer guided learning while practising this SketchUp to d5 render workflow, follow a short d5 render SketchUp tutorial to master live sync basics and material mapping.
Key Features to Leverage (for Beginners & Architects)
D5 offers a range of tools that boost productivity and render quality. The following are the most useful features to explore:
-
Live Sync: Keeps SketchUp and D5 connected, updating model changes automatically without re-importing files. It enables a continuous feedback loop for real-time decision-making.
-
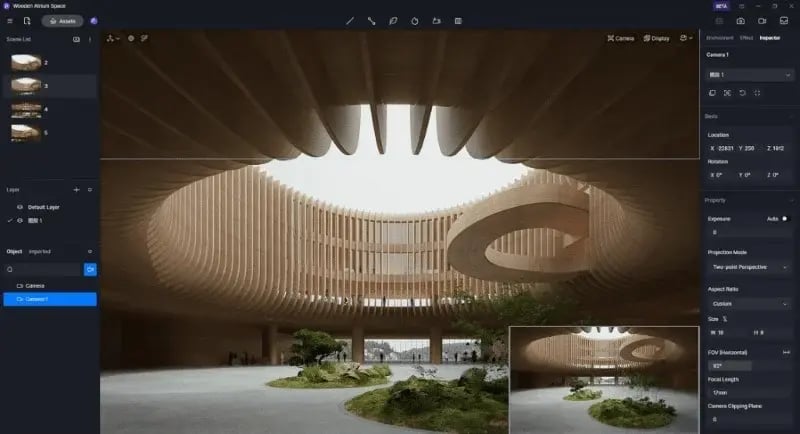
Material Library: Access a rich set of d5 render textures, including wood, metal, glass, and concrete. Each texture is optimised for realistic surface response under various lighting conditions.
-
Real-Time Sky and Sun System: Adjust the sun position and environment lighting interactively to simulate natural daylight and seasonal variations.
-
Asset Library: Populate your scenes with pre-built furniture, trees, vehicles, and characters to bring architectural spaces to life. These assets are optimised to maintain rendering speed.
-
Post-Processing Controls: Apply exposure, bloom, vignette, and glare adjustments directly inside D5 for professional-quality image refinement.
-
Render Passes and AOVs: Export depth, shadow, reflection, and ambient occlusion layers for better control in post-production workflows.
-
Background Options: Easily set transparent backgrounds using the built-in export settings when learning how to make transparent background D5 render for overlay or compositing tasks.
-
Hardware Acceleration: D5 fully utilises GPU rendering, enabling faster previews and final outputs even with detailed models.
These tools make D5 suitable for beginners experimenting with quick concepts and professionals focusing on architectural rendering with SketchUp and D5 render at the presentation level.
Best Practice Tips & Common Mistakes
Follow these tips to optimize your workflow and avoid common rendering errors.
-
Clean Your Model: Remove unnecessary geometry, unused layers, and complex components that slow down both SketchUp and D5.
-
Check Material Scales: Incorrect texture scaling can distort surfaces. Always verify texture proportion before final rendering.
-
Balance Post-Processing: Avoid overusing filters; achieve the correct exposure and colour within D5 before minor post adjustments.
-
Maintain Backups: Save iterations of your SketchUp file to avoid plugin-related corruption or accidental loss of linked textures.
Once you master D5 Render for SketchUp integration, combining it with computational-design skills opens doors to faster, higher-quality architectural presentations.
Learn D5 Render & Computational Design
For professionals who want to integrate technology deeper into their creative process, there is an advanced learning pathway. Transform how you design and think with Novatr’s Master Computational Design, a hands-on program built to help architects and designers future-proof their careers.

Here’s what you’ll learn in detail:
-
5 powerful industry tools; Grasshopper, Rhino 3D, Flux.ai, ComfyUI, and D5 Render.
-
Master popular plugins like Paneling Tools, DeCoding Spaces, Anemone, Galapagos, Wallacei, LunchBox, Open Nest, and Horster Animation to create smarter, faster design workflows.
-
Understand how to build parametric and generative design workflows used by top global firms.
-
Learn how to automate repetitive design tasks, explore AI-driven creativity, and produce high-quality renders for presentations.
-
Develop a professional computational design portfolio showcasing your project-based learning.
Earn a dual certification from Novatr and NSDC (National Skill Development Corporation) and unlock your pathway into future-ready architecture and design.
Disclaimer - Course details, including curriculum, duration, fees, and related information, are for informational purposes only and may change at the company’s discretion without prior notice. Please visit the official course page or contact our admissions team for the latest updates.